Creating a Large Scale Mural
- Mandy Jakich
- May 7, 2022
- 10 min read
Updated: May 30, 2022
I have just completed a very big exciting Creatives in Schools Mural Project (Ministry of Education NZ) with year 7 and 8 children from Helensville Primary School, north west of Tāmaki Makaurau Auckland (NZ).
I'd like to share this journey with you and the learning and insights I have gained from this experience.


Creatives in Schools
The Creatives in Schools programme is delivered by the Ministry of Education in partnership with the Ministry for Culture and Heritage Te Manatū Taonga and Creative New Zealand.
The Ministry of Education invites schools and kura throughout New Zealand to apply for funding to deliver a new creative project in partnership with a professional artist or creative practitioner.
Schools, kura, and creative(s) work together to plan a project and then submit a joint application. If your proposal is successful, schools and kura will work with the creative to deliver the creative experience for students and ākonga.
The Creatives in Schools learning experiences enhance students’ wellbeing; improves their core competencies in communication, collaboration, and creative thinking; and raises their awareness of careers in the arts and creative sectors.
The Project
We started this project in February 2021 and completed it at the end of term 1 2022. Much longer than the expected 8 - 20 weeks for a Creatives in Schools project!
There were a number of factors that shut down the project at various times namely the COVID 19 Pandemic, lockdowns, weather conditions and working restrictions within the school due to COVID.
The school decided on the space for us to work on - a large area on the ground outside their Wharenui. I went away and did some research to decide on the materials and processes needed and a concept for the mural that would make sense to the children, the location and the community. I needed to choose a project idea that could be created by the children to a high standard and feel accessible to them. Although the idea of allowing the children to come up with the project design sounds appealing, I have learnt from experience that it's best for the lead teacher/creative to come up with the overall idea then allow the children to contribute to the finer details, format and design.
I decided on the Pacific Island Tapa inspired concept as the gridded format suited the space, it was a good format for creating individual designs that could then be combined and the design worked well on the ground. Tapa is a coarse cloth made in the Pacific islands from the pounded bark especially of the paper mulberry and usually decorated with geometric patterns. We used traditional tapa cloth designs and artists whose work responds to tapa ideas such as Samoan painter and sculptor Fatu Feu'u as a starting point.

The Creative Process
Things to consider before finalising your concept
It's important to ask yourself these questions and talk through the considerations with your students before coming up with the mural design. Artists consider these things when they create an art installation, public art, a sculpture or artwork for a specific site or space.
Purpose
Why do we want a mural like this in the school?
Why do we want a mural in this specific site?
What will it bring to the school environment and the students/school whanau?
Who is it for?
What will we learn from this experience?
How will it enhance the space?
How does it connect to our school, whanau, community?
Location
Where will it be situated in the school?
What else is in this space?
How is this space used and by whom?
Is it a shady/sunny, damp/dry, cold/hot space?
Scale
How big is the space and how big should the mural be within this space?
Shape
What shape should it be within the space?
Does it need to be parallel to something nearby or a wall or is it its own shape within the space?
Audience
Who will benefit from and enjoy the mural?
Who are we making it for?
Why are we making it?
What are the cultures, ages, backgrounds of our audience?
Ideas to communicate
Place
Culture and Nationality
New Zealand
Flora and Fauna
Pattern and shape
CONSIDERATIONS WE MADE BEFORE FINALISING THE DESIGN
Helensville is a small township built around a river. The river is an iconic symbol in the area. This idea ran throughout the mural with reference to it through colour, pattern and shape within the design.
We wanted to express the Maori and Pacific Island cultures in the school and community. The Tapa design communicated our Pacific Island connections and we included Kowhaiwhai patterns and other shapes and symbols to represent our Maori and Pacific cultures.
As it was a ground mural we felt it needed to fill the whole space so it didn't look like a little mat in the middle!
We made the sides parallel to the Wharenui and nearby buildings to make it feel like it belonged and related to it's surroundings
It felt like an appropriate welcome for people arriving at or leaving the Wharenui
We included references to NZ and Pacific Island plants such as Nikau, Monstera, Hibiscus, Frangipani, Silver Fern
We included animals that referenced NZ and the local area such as kiwi, stingray, Moa, turtle, lizard
We referenced the nearby sea and harbour
We added some geometric designs for contrast and visual interest
We chose designs that weren't too complex and detailed as painting on uneven concrete was never going to be easy and we knew the standard of the finished work had to be high
EXPLORING and EXPERIMENTING
We began the project in the classroom to:
build relationships and connections
explore tapa cloth design
explore artists who create work inspired by Tapa such as Fatu Feu'u
explore geometric designs and symbols in a square format
experiment with different ideas and designs on paper
develop painting techniques and skills
create paintings of individual designs on paper for display and as a way to practise painting techniques and develop skills before starting the mural
share and reflect throughout the process


SHARING OUR FIRST PAINTINGS ON PAPER
Using test pots of the colours we chose for the mural, we painted our designs. These will be framed and put up around the school.


CHOOSING THE PAINT
We used Resene Paints for this project and received a 30% discount as it is a school project. We used a white concrete sealer/primer (2 coats thickly applied with a roller) and Walk On paint for the mural, again thickly applied and sometimes 2 coats depending on the coverage and opacity of the colour. Resene advised there was no need for a top sealer coat. We actually used nearly twice as much as Resene said we would need for this space. The concrete was very thirsty!
CHOOSING THE COLOURS
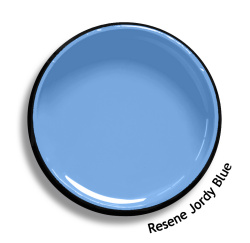
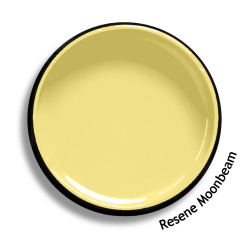
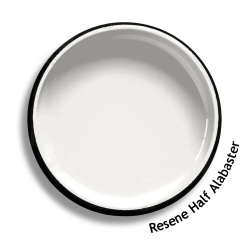
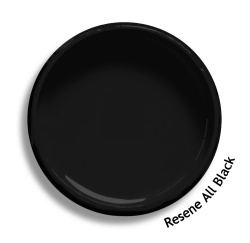
I felt a limited colour palette would be more effective. The children and I chose the final colours after some experimentation. Black, off-white, soft yellow and 2 shades of blue. We thought black and white would be striking, the blues represented the iconic river that runs through Helensville and the yellow contrasted well with these colours.
PREPARING THE SPACE

A very important step in the process to ensure a good result! We scrubbed the concrete with brooms and detergent and rinsed off with the fire hose (which unattached itself from the pipe and flooded the hall, but that's another story!!)
The caretaker marked off the area with tape for us (and cleaned up the flooded hall, poor Rusty)
MEASURING UP, CUTTING IN and APPLYING SEALER/PRIMER

I measured up the square (8m x 8m) and made sure it was parallel to the Wharenui and surrounding building and fence. I taped the outside line and children cut in with a paint brush to get a nice straight outer line. We removed the tape when the paint was dry. The children rolled on the 2 coats of concrete primer over the entire large square.


TAPING INDIVIDUAL SQUARES
This was a challenge. The squares didn't all end up exactly the same measurement but I made sure all the squares from each line were measured exactly the same, ensuring the lines were even and parallel and it looked right. Because the ground area slopes in some places it looked uneven from some angles so I had to move around to observe the lines and squares closely and trust my eye before finalising the taping. We painted then removed the tape when the paint was dry. Some lines and spaces between squares had to be filled in at the end. I did all of the taping as it was important we got this part right.

DRAWING IN DESIGNS
The children used builders pencils, erasers and sometimes rulers (although this was discouraged unless their pattern was very symmetrical or geometric).

PAINTING
We used small flat and round brushes, medium flat and round brushes and flat larger brushes. The brushes took a beating painting on concrete and had to be discarded at the end of the project. The brush cleaning was a bit of a nightmare at the end of each session but the children took turns to do this job and we soaked them in water and detergent first. I divided the paint into small recycled containers so each child had their own little pot of paint and could swap when they changed colours. The only time I let a child pour paint from the tin resulted in a big spill - wouldn't recommend!

CELEBRATION
The school is organising a Powhiri and celebration for the children involved and their whānau to celebrate this project, their achievement and their contribution to the school.
My Tips and Observations
Choose your own space for the project.
Next time I would decide on a number of appropriate spaces around the school which would work for the mural and suggest these to the school as options they can choose from.
Develop the creative process before starting the mural
At the beginning, our work in the classroom was hard for the students as they just wanted to get on with painting the mural. Especially as they didn't know me yet, they found it tough and I found them quite hard to motivate at times. Children aren't used to being a part of a long term project and often like to get to the fun stuff straight away. From talking to the kids afterwards, I think they could see the need for the exploring and experimenting and painting work we did at the beginning.
A long project like this with many stages is challenging for children and I lost of few along the way. It wasn't an instant fix! On the other hand, I had a very loyal hard working group of children who thrived on the project and it became a happy place for them. I ended up feeling like we had established a bit of a 'mural family' and we all enjoyed each others company very much and had a fun time together. I'll miss them!
Always create paintings on paper first
This worked well as a way to build the anticipation for the project, share the work we are doing, record part of the process and celebrate the results.
Paint quantities
I bought twice as much paint as Resene recommended in the end. We did apply it generously but I think that's necessary for this kind of mural on this kind of surface
Painting on concrete
This concrete was smooth in some places and very rough in other places. The surface required a lot of paint to cover well and it was not always easy to paint a sharp line
Concrete holds moisture for AGES! Even without rain, the concrete would be wet in the morning and some parts wouldn't dry all day. From April onwards it got too shady and cool and the weather became too unreliable.
I'd recommend painting a ground mural in NZ from December - early April only unless you have a very sunny space in which case you could probably paint til the end of term one
A ground mural on concrete is more effort and takes more time than a wall mural.
Supervising children's work and quality control.
I was kind and gentle (I think! I hope!) and I expected a lot from these students. Now and then I had to ask children to draw something again, paint over something or even start a whole new design and they understood the need to keep our work to a high standard and consistent with other designs and ideas.
I insisted that they spoke to me before they made any decisions and went ahead with new designs.
Management of children working on the mural
A few children decided this project wasn't for them and I allowed them to drop out. I didn't want it to become a negative experience for them and I also didn't want to manage someone who didn't want to be there.
I took on some extra children at the end who were recommended by their teachers. This worked well and it was good to have some extra children involved for the final push.
Some children were better painters than drawers and vice versa, so I gently guided them to stick with these areas.
We lost some of the year eights at the end of 2021 part way through the project which was a shame. Completing the project within one school year is preferable.
Time frames.
Each Creatives in Schools project budgets for 100 hours of work for the Creative. I stopped counting the hours I worked on this project a while ago but it was definitely way more than 100 hours. This was exacerbated by COVID restrictions and not being able to work with many children at a time in the final term. All part of the challenges of the pandemic but I would recommend not taking on too huge a project with children if you only have 100 hours to complete it in. When you think about it, that's only about 16 full days, which isn't much if you want to develop a full creative process and a high quality mural.
Cleaning the mural
Develop a system for regular cleaning of the mural once you have finished the project and ask for it to be made into a 'no play' zone, to keep it looking good and wearing as well as possible for as long as possible.
After a break, we had to clean the mural thoroughly before starting up again.
Children's Confidence and Skills
It was wonderful to see the children gain so much confidence and refine their skills as the project progressed. Many of the children ended up creating new designs as we worked and after discussing the idea with me would competently draw up their new design.
The children involved were immensely proud of their work and their collective achievement.
The Experience For Me
I loved it!
I learnt so much.
I found it quite tiring!
I feel very proud of what we have achieved and proud of the children and their incredible efforts and skills.
I enjoyed working with the school and appreciated the support, particularly from my support teacher Tania McCorkindale and the caretakers.
Challenges
Sharpening the pencils for the children with a razor blade very 5 minutes arrgghhhh! Concrete eats pencils!

Kids (and me!) stepping in wet paint and marking the outside concrete around the mural with painty footprints - Next time I'd tape plastic or lay drop cloths around the perimeter.
Walking on wet paint on the mural! Develop systems for applying paint touch ups so no one walks on wet paint. Maybe work in grids or lines and all work in the same direction.
Other kids walking on the wet paint. Keeping school students off the mural once we had finished for the day (despite the barriers!) was hard. This paint takes a while to dry. Make sure you barricade the area in some way and make it clear the paint is wet.
The Final Stunning Mural


Are you searching for affordable ways to enjoy online gaming? A low deposit casino is your perfect solution, allowing you to play top-quality slots, table games, and live dealer options with a small initial investment. At casinoslots.co.nz/minimum-deposit, you’ll find trusted platforms offering deposits as low as $1, $5, or $10. These casinos are ideal for beginners or players looking to minimize risk while still having access to premium games and exciting bonuses. Affordable gaming has never been easier—start playing today and make the most of your budget!